容器与Bean
# 容器
# BeanFactory
ApplicationContext的父接口,核心容器,ApplicationContext的实现都组合了BeanFactory的功能;
功能:表面只有getBean(),实际控制反转,依赖注入,Bean的生命周期都由其实现类提供;
通过反射查看它的成员变量 singletonObjects,内部包含了所有的单例 Bean:
ConfigurableApplicationContext context = SpringApplication.run(A01.class, args);
......
Field singletonObjects = DefaultSingletonBeanRegistry.class.getDeclaredField("singletonObjects");
        singletonObjects.setAccessible(true);
        ConfigurableListableBeanFactory beanFactory = context.getBeanFactory();
        Map<String, Object> map = (Map<String, Object>) singletonObjects.get(beanFactory);
        map.entrySet().stream().filter(e -> e.getKey().startsWith("component"))
                .forEach(e -> {
                    System.out.println(e.getKey() + "=" + e.getValue());
                });
1
2
3
4
5
6
7
8
9
10
容器实现:DefaultListableBeanFactory
负责控制反转和依赖注入功能;
public class TestBeanFactory {
    public static void main(String[] args) {
        DefaultListableBeanFactory beanFactory = new DefaultListableBeanFactory();
        // bean 的定义(class, scope, 初始化, 销毁)
        AbstractBeanDefinition beanDefinition =
                BeanDefinitionBuilder.genericBeanDefinition(Config.class).setScope("singleton").getBeanDefinition();
        beanFactory.registerBeanDefinition("config", beanDefinition);
        /**
         * BeanFactory 后处理器
         */
        // 如何获取@Configuration这个Bean下的所有Bean?
        // 给 BeanFactory 添加一些常用的后处理器
        AnnotationConfigUtils.registerAnnotationConfigProcessors(beanFactory);
        // BeanFactory 后处理器主要功能,补充了一些 bean 定义
        beanFactory.getBeansOfType(BeanFactoryPostProcessor.class).values().forEach(beanFactoryPostProcessor -> {
            beanFactoryPostProcessor.postProcessBeanFactory(beanFactory);
        });
        /**
         * Bean 后处理器
         */
        // 如何找到依赖注入的Bean?
        // Bean 后处理器, 针对 bean 的生命周期的各个阶段提供扩展, 例如 @Autowired @Resource ...
        beanFactory.getBeansOfType(BeanPostProcessor.class).values().forEach(beanPostProcessor->{
            System.out.println(">>>>>>>>"+beanPostProcessor);
            // 添加BeanFactory与 Bean后处理器 之间的联系
            beanFactory.addBeanPostProcessor(beanPostProcessor);
        });
        for(String name:beanFactory.getBeanDefinitionNames()){
            System.out.println(name);
        }

        // 所有的bean先创建BeanDefinition,真正调用才创建实例,单例对象建议一开始就创建好
        beanFactory.preInstantiateSingletons(); // 准备好所有单例
        System.out.println(">>>>>>>>>>>>>>>>>>>>>>>>>>>>>>>>>>>> ");
        System.out.println(beanFactory.getBean(Bean1.class).getBean2());
    }


    @Configuration
    static class Config {
        @Bean
        public Bean1 bean1() {
            return new Bean1();
        }
        @Bean
        public Bean2 bean2(){
            return new Bean2();
        }
    }
    static class Bean1{
        private static final Logger log = LoggerFactory.getLogger(Bean1.class);
        public Bean1() {
            log.debug("构造 Bean1()");
        }
        @Autowired
        private Bean2 bean2;
        public Bean2 getBean2() {
            return bean2;
        }
    }
    static class Bean2{
        private static final Logger log = LoggerFactory.getLogger(Bean2.class);
        public Bean2() {
            log.debug("构造 Bean2()");
        }
    }
}
1
2
3
4
5
6
7
8
9
10
11
12
13
14
15
16
17
18
19
20
21
22
23
24
25
26
27
28
29
30
31
32
33
34
35
36
37
38
39
40
41
42
43
44
45
46
47
48
49
50
51
52
53
54
55
56
57
58
59
60
61
62
63
64
65
66
67
# ApplicationContext
BeanFactory 的子接口。它扩展了 BeanFactory 接口的功能,如:
国际化;
通配符方式获取一组 Resource 资源;
ConfigurableApplicationContext context = SpringApplication.run(A01.class, args);
......
Resource[] resources = context.getResources("classpath*:META-INF/spring.factories");
for (Resource resource : resources) {
    System.out.println(resource);
}
1
2
3
4
5
6整合 Environment 环境(能通过它获取各种来源的配置信息);
context.getEnvironment().getProperty("java_home")1事件发布与监听,实现组件之间的解耦;
事件
UserRegisteredEvent:public class UserRegisteredEvent extends ApplicationEvent { public UserRegisteredEvent(Object source) { super(source); } }1
2
3
4
5Bean1负责用户注册然后发送通知:
@Component
public class Component1 {
    private static final Logger log = LoggerFactory.getLogger(Component1.class);

    @Autowired
    private ApplicationEventPublisher context;

    public void register(){
        log.debug("用户注册");
        context.publishEvent(new UserRegisteredEvent(this));
    }

}
1
2
3
4
5
6
7
8
9
10
11
12
13Bean2:
@Component
public class Component2 {
    private static final Logger log = LoggerFactory.getLogger(Component2.class);

    @EventListener
    public void test(UserRegisteredEvent event){
        log.debug("{}",event);
        log.debug("发送短信");
    }
}
1
2
3
4
5
6
7
8
9
10启动类:
@SpringBootApplication
public class A01 {
    private static final Logger log = LoggerFactory.getLogger(A01.class);

    public static void main(String[] args) {
        ConfigurableApplicationContext context = SpringApplication.run(A01.class,args);
        context.getBean(Component1.class).register();
    }
}
1
2
3
4
5
6
7
8
9
容器实现:
ClassPathXmlApplicationContext,从类路径查找 XML 配置文件,创建容器(旧);
FileSystemXmlApplicationContext,从磁盘路径查找 XML 配置文件,创建容器(旧);
XmlWebApplicationContext,传统 SSM 整合时,基于 XML 配置文件的容器(旧);
AnnotationConfigWebApplicationContext,传统 SSM 整合时,基于 java 配置类的容器(旧);
AnnotationConfigApplicationContext,Spring boot 中非 web 环境容器(新);
private static void testAnnotationConfigApplicationContext() {
    AnnotationConfigApplicationContext context =
            new AnnotationConfigApplicationContext(Config.class);
    for (String name : context.getBeanDefinitionNames()) {
        System.out.println(name);
    }
    System.out.println(context.getBean(Bean2.class).getBean1());
}

@Configuration
static class Config{
    @Bean
    public Bean1 bean1(){
        return new Bean1();
    }
    @Bean
    public Bean2 bean2(Bean1 bean1){
        Bean2 bean2 = new Bean2();
        bean2.setBean1(bean1);
        return bean2;
    }
}
static class Bean1{}
static class Bean2{
    private Bean1 bean1;
    public Bean1 getBean1() {
        return bean1;
    }
    public void setBean1(Bean1 bean1) {
        this.bean1 = bean1;
    }
}
1
2
3
4
5
6
7
8
9
10
11
12
13
14
15
16
17
18
19
20
21
22
23
24
25
26
27
28
29
30
31
32AnnotationConfigServletWebServerApplicationContext,Spring boot 中 servlet web 环境容器(新);
private static void testAnnotationConfigServletWebServerApplicationContext() {
    AnnotationConfigServletWebServerApplicationContext context =
            new AnnotationConfigServletWebServerApplicationContext(WebConfig.class);
    for (String name : context.getBeanDefinitionNames()) {
        System.out.println(name);
    }
}

@Configuration
static class WebConfig{
    @Bean
    public ServletWebServerFactory servletWebServerFactory(){
        return new TomcatServletWebServerFactory();
    }
    @Bean
    public DispatcherServlet dispatcherServlet() {
        return new DispatcherServlet();
    }
    // 将Servlet注册到tomcat服务器上
    @Bean
    public DispatcherServletRegistrationBean registrationBean(DispatcherServlet dispatcherServlet) {
        return new DispatcherServletRegistrationBean(dispatcherServlet, "/");
    }
    @Bean("/hello")
    public Controller controller1() {
        return (request, response) -> {
            response.getWriter().print("hello");
            return null;
        };
    }
}
1
2
3
4
5
6
7
8
9
10
11
12
13
14
15
16
17
18
19
20
21
22
23
24
25
26
27
28
29
30
31AnnotationConfigReactiveWebServerApplicationContext,Spring boot 中 reactive web 环境容器(新);
# Bean
# 生命周期
graph LR

创建 --> 依赖注入
依赖注入 --> 初始化
初始化 --> 可用
可用 --> 销毁
2
3
4
5
6
创建:根据 bean 的构造方法或者工厂方法来创建 bean 实例对象;
依赖注入:根据 @Autowired,@Value 或其它一些手段,为 bean 的成员变量填充值、建立关系;
初始化:回调各种 Aware 接口,调用对象的各种初始化方法;
销毁:在容器关闭时,会销毁所有单例对象(即调用它们的销毁方法);
prototype 对象也能够销毁,不过需要容器这边主动调用;
# Bean增强
实例化前后的增强:
postProcessBeforeInstantiation
这里返回的对象若不为 null 会替换掉原本的 bean,并且仅会走 postProcessAfterInitialization 流程;
postProcessAfterInstantiation
这里如果返回 false 会跳过依赖注入阶段;
依赖注入前的增强:
postProcessProperties
如 @Autowired、@Value、@Resource ;
初始化前后的增强:
postProcessBeforeInitialization
这里返回的对象会替换掉原本的 bean,如 @PostConstruct、@ConfigurationProperties;
postProcessAfterInitialization
这里返回的对象会替换掉原本的 bean,如代理增强;
销毁之前的增强:
postProcessBeforeDestruction
如 @PreDestroy ;
# Bean后处理器
Spring自带Bean后处理器:
- AutowiredAnnotationBeanPostProcessor 解析 @Autowired 与 @Value
- CommonAnnotationBeanPostProcessor 解析 @Resource、@PostConstruct、@PreDestroy
- ConfigurationPropertiesBindingPostProcessor 解析 @ConfigurationProperties
- ContextAnnotationAutowireCandidateResolver 负责获取 @Value 的值,解析 @Qualifier、泛型、@Lazy 等
# BeanFactory后处理器
Spring自带BeanFactory后处理器:
- ConfigurationClassPostProcessor 可以解析
- @ComponentScan
- @Bean
- @Import
- @ImportResource
- MapperScannerConfigurer 可以解析
- Mapper 接口
GenericApplicationContext context = new GenericApplicationContext();
context.registerBean("config", Config.class);
context.registerBean(ConfigurationClassPostProcessor.class); // 这个Bean 用于解析 @ComponentScan @Bean @Import @ImportResource
context.registerBean(MapperScannerConfigurer.class, bd -> { // 这个Bean 用于解析 @MapperScanner  Mybatis用
    bd.getPropertyValues().add("basePackage", "com.Nreal.IOC.A3.mapper");
});


context.refresh();
for (String name : context.getBeanDefinitionNames()) {
    System.out.println(name);
}
2
3
4
5
6
7
8
9
10
11
12
自定义BeanFactory后处理器:
Config Bean:
@Configuration
@ComponentScan("com.Nreal.IOC.A3.component")
public class Config {
    @Bean
    public Bean1 bean1() {
        return new Bean1();
    }

    @Bean
    public SqlSessionFactoryBean sqlSessionFactoryBean(DataSource dataSource) {
        SqlSessionFactoryBean sqlSessionFactoryBean = new SqlSessionFactoryBean();
        sqlSessionFactoryBean.setDataSource(dataSource);
        return sqlSessionFactoryBean;
    }

    @Bean(initMethod = "init")
    public DruidDataSource dataSource() {
        DruidDataSource dataSource = new DruidDataSource();
        dataSource.setUrl("jdbc:mysql://localhost:3306/test");
        dataSource.setUsername("root");
        dataSource.setPassword("root");
        return dataSource;
    }
}
2
3
4
5
6
7
8
9
10
11
12
13
14
15
16
17
18
19
20
21
22
23
24
将@ComponentScan的Bean加入容器;
public class ComponentScanPostProcessor implements BeanDefinitionRegistryPostProcessor {
    @Override // context.refresh
    public void postProcessBeanFactory(ConfigurableListableBeanFactory configurableListableBeanFactory) throws BeansException {

    }

    // 将@CompponetScan 中包里的带有@Component的Bean注册到容器里
    @Override
    public void postProcessBeanDefinitionRegistry(BeanDefinitionRegistry beanFactory) throws BeansException {
        try {
            ComponentScan componentScan = AnnotationUtils.findAnnotation(Config.class, ComponentScan.class);
            if (componentScan != null) {
                for (String p : componentScan.basePackages()) {
                    System.out.println(p);
                    // com.itheima.a05.component -> classpath*:com/itheima/a05/component/**/*.class
                    String path = "classpath*:" + p.replace(".", "/") + "/**/*.class";
                    //System.out.println(path);
                    CachingMetadataReaderFactory factory = new CachingMetadataReaderFactory();
                    Resource[] resources = new PathMatchingResourcePatternResolver().getResources(path);// context.getResources(path)
                    AnnotationBeanNameGenerator generator = new AnnotationBeanNameGenerator();
                    for (Resource resource : resources) {
                        // System.out.println(resource);
                        MetadataReader reader = factory.getMetadataReader(resource);
                        // System.out.println("类名:" + reader.getClassMetadata().getClassName());
                        AnnotationMetadata annotationMetadata = reader.getAnnotationMetadata();
                        // System.out.println("是否加了 @Component:" + annotationMetadata.hasAnnotation(Component.class.getName()));//Component
                        // System.out.println("是否加了 @Component 派生:" + annotationMetadata.hasMetaAnnotation(Component.class.getName()));//Controller
                        if (annotationMetadata.hasAnnotation(Component.class.getName())
                            || annotationMetadata.hasMetaAnnotation(Component.class.getName())) {
                            AbstractBeanDefinition bd = BeanDefinitionBuilder
                                    .genericBeanDefinition(reader.getClassMetadata().getClassName())
                                    .getBeanDefinition();
                            String name = generator.generateBeanName(bd, beanFactory);
                            beanFactory.registerBeanDefinition(name, bd);
                        }
                    }
                }
            }
        } catch (IOException e) {
            e.printStackTrace();
        }
    }
}
1
2
3
4
5
6
7
8
9
10
11
12
13
14
15
16
17
18
19
20
21
22
23
24
25
26
27
28
29
30
31
32
33
34
35
36
37
38
39
40
41
42
43将@Configuration下的@Bean加入容器;
public class AtBeanPostProcessor implements BeanDefinitionRegistryPostProcessor {
    @Override
    public void postProcessBeanFactory(ConfigurableListableBeanFactory configurableListableBeanFactory) throws BeansException {

    }

    @Override
    public void postProcessBeanDefinitionRegistry(BeanDefinitionRegistry beanFactory) throws BeansException {
        try {
            CachingMetadataReaderFactory factory = new CachingMetadataReaderFactory();
            //MetadataReader不走类加载,效率比反射高
            MetadataReader reader = factory.getMetadataReader(new ClassPathResource("com/Nreal/IOC/A3/Config.class"));
            Set<MethodMetadata> methods = reader.getAnnotationMetadata().getAnnotatedMethods(Bean.class.getName());
            for (MethodMetadata method : methods) {
                System.out.println(method);
                String initMethod = method.getAnnotationAttributes(Bean.class.getName()).get("initMethod").toString();
                BeanDefinitionBuilder builder = BeanDefinitionBuilder.genericBeanDefinition();
                // 调用的是@Config下的@Bean
                builder.setFactoryMethodOnBean(method.getMethodName(), "config");
                // 指定自动装配模式,否则解析不了DataSource
                builder.setAutowireMode(AbstractBeanDefinition.AUTOWIRE_CONSTRUCTOR);
                if (initMethod.length() > 0) {
                    builder.setInitMethodName(initMethod);
                }
                AbstractBeanDefinition bd = builder.getBeanDefinition();
                beanFactory.registerBeanDefinition(method.getMethodName(), bd);
            }
        } catch (IOException e) {
            e.printStackTrace();
        }
    }
}
1
2
3
4
5
6
7
8
9
10
11
12
13
14
15
16
17
18
19
20
21
22
23
24
25
26
27
28
29
30
31
32测试:
context.registerBean(ComponentScanPostProcessor.class); // 解析 @ComponentScan
context.registerBean(AtBeanPostProcessor.class); // 解析 @Bean
1
2扫描到的Bean:
config com.Nreal.IOC.A3.ComponentScanPostProcessor com.Nreal.IOC.A3.AtBeanPostProcessor bean2 bean3 bean1 sqlSessionFactoryBean dataSource
# Aware&InitializingBean
Aware接口:
- BeanNameAware 注入 bean 的名字;
- BeanFactoryAware 注入 BeanFactory 容器;
- ApplicationContextAware 注入 ApplicationContext 容器;
- EmbeddedValueResolverAware ${};
为什么需要 Aware?
@Autowired 的解析需要用到 bean后处理器,属于扩展功能;
而 Aware接口属于内置功能,不加任何扩展,Spring 就能识别;
案例:
public class MyBean implements BeanNameAware, ApplicationContextAware, InitializingBean {

    private static final Logger log = LoggerFactory.getLogger(MyBean.class);

    @Override
    public void setBeanName(String name) {
        log.debug("当前bean " + this + " 名字叫:" + name);
    }

    @Override
    public void afterPropertiesSet() throws Exception {
        log.debug("当前bean " + this + " 初始化");
    }

    @Override
    public void setApplicationContext(ApplicationContext applicationContext) throws BeansException {
        log.debug("当前bean " + this + " 容器是:" + applicationContext);
    }

    // 没有Bean后处理器,下两个方法不生效
    @Autowired
    public void NeedBeanPostProcessor(ApplicationContext applicationContext) {
        log.debug("当前bean " + this + " 使用@Autowired 容器是:" + applicationContext);
    }

    @PostConstruct
    public void init() {
        log.debug("当前bean " + this + " 使用@PostConstruct 初始化");
    }
}
2
3
4
5
6
7
8
9
10
11
12
13
14
15
16
17
18
19
20
21
22
23
24
25
26
27
28
29
30
public class TestAware {
    private static final Logger log = LoggerFactory.getLogger(TestAware.class);

    public static void main(String[] args) {
        GenericApplicationContext context = new GenericApplicationContext();
        context.registerBean("myBean", MyBean.class);

        // bean后处理器
        context.registerBean(AutowiredAnnotationBeanPostProcessor.class);
        context.registerBean(CommonAnnotationBeanPostProcessor.class);
        context.registerBean(ConfigurationClassPostProcessor.class);

        context.refresh();
        context.close();
    }
}
2
3
4
5
6
7
8
9
10
11
12
13
14
15
16
配置类@Autowired失效
@Configuration
public class MyConfig1 {
    private static final Logger log = LoggerFactory.getLogger(MyConfig1.class);

    @Autowired
    public void setApplicationContext(ApplicationContext applicationContext) {
        log.debug("注入 ApplicationContext");
    }

    @PostConstruct
    public void init() {
        log.debug("初始化");
    }

    @Bean //  beanFactory 后处理器
    public BeanFactoryPostProcessor processor1() {
        return beanFactory -> {
            log.debug("执行 processor1");
        };
    }

}
2
3
4
5
6
7
8
9
10
11
12
13
14
15
16
17
18
19
20
21
22
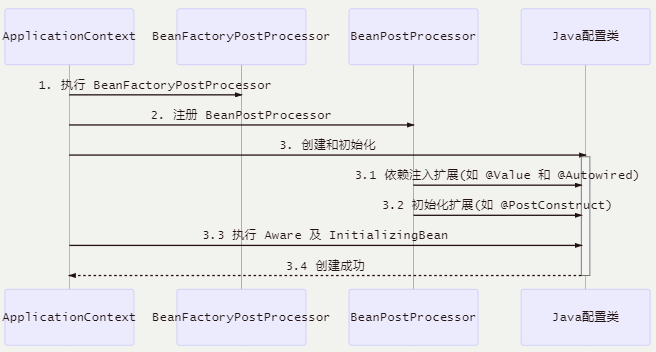
只会执行 processor1,@Autowired与@PostConstruct全部失效;
原因:使用了 BeanFactoryPostProcessor,调用这个方法,必须提前创建 Java配置类,而此时BeanPostProcessor还未准备好,导致@Autowired等注解失效;
Java 配置类不包含 BeanFactoryPostProcessor 的情况:
包含 BeanFactoryPostProcessor 的情况:
解决方法:使用Aware与InitializingBean接口;
@Configuration
public class MyConfig2 implements InitializingBean, ApplicationContextAware {
 private static final Logger log = LoggerFactory.getLogger(MyConfig2.class);

 @Override
public void afterPropertiesSet() throws Exception {
     log.debug("初始化");
}

 @Override
 public void setApplicationContext(ApplicationContext applicationContext) throws BeansException {
     log.debug("注入 ApplicationContext");
 }

 @Bean //  beanFactory 后处理器
 public BeanFactoryPostProcessor processor2() {
     return beanFactory -> {
         log.debug("执行 processor2");
     };
 }
}
1
2
3
4
5
6
7
8
9
10
11
12
13
14
15
16
17
18
19
20
21